Drums
Within this manual, or indeed within PR8 itself, Drum or Drum Patch refers to the collection of voices (and their associated parameters) that are used to create sound when assigned to a Pattern Track. You assign one Drum per Track and it's not possible to change the assigned Drum number within the Track (within the Phrase to be more precise) but instead you can modify parameters of the Drums via automation.
Each Drum Patch in PR8 can be made up of any combination of the NES's 5 sound generating voices. In PR8, those voices are referred to as such:
| NES Voice | PR8 Name | PR8 Symbol |
|---|---|---|
| Square 1 | A |  |
| Square 2 | B |  |
| Triangle | C |  |
| Noise | D |  |
| DCM | E |  |
The importance of the 'PR8 Name' and the graphic in the 'PR8 Symbol' column will make more sense when you read about Drum Editing
Drum Editor
The lower section of PR8's screen is dedicated to the editing of Drum Patches.
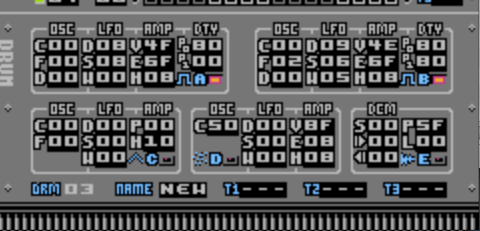
PR8 Drum Editor
You can see that the Drum Editor is further split into 5 sub-sections (surrounded by a light-grey outline). Each of these sections relates to one of the 5 sound generating voices of the NES. At any time, all of the parameters shown in the Drum Editor belong to the single Drum that is assigned to the current Track (the one your cursor is on).
For example here is the top-left section which controls the sound generation for the Square 1 (or voice 'A') of a Drum Patch.
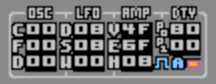
Voice A Section of Drum Editor
All the parameters for controlling Voice A (of this Drum Patch) are contained in that one box. The parameters are further divided into related groups and given their own headings. From the image you can see that the headings are: OSC, LFO, AMP, DTY. These groups control, respectively, the Oscillator (coarse and fine pitch offsets), Low Frequency Oscillator (pitch modulation, vibrato, arpeggio etc), Amplitude (envelope, volume, curve) and Duty (in this instance a specific setting for Voice A and B to control the duty/pulse width).
At the bottom-right corner of the box is the enable/disable button for this Voice for this Drum Patch. You'll also see that at the side of the button is the label and symbol from the previous table. In this image, Voice A is actually turned on but if you look back to the main Drum Editor image (above) you'll see that the Drum Patch only uses Voices A and B - indicated by the fact that all Voices apart from Voice A and B have their enable/disable switch unlit (not red).
You might also notice that the enable/disable button for Voice D is in a different place than all the other Voices. This is just because I wanted to keep the sub-groups in (roughly) the same order and as such the layout of the parameters left space under the OSC column.
Drum Auxiliary Parameters
The very bottom row of parameters in the Drum Editor are called Drum Aux Parameters.

Drum Aux Parameters
From left-to-right, DRM is the numerical ID for this Drum Patch which you cannot modify. NAME is a three-letter name that you can edit to help identify and manage your Drum Patches.
Trigger Automation
The last three parameters, T1, T2 and T3 are quite special. These three parameters are Trigger Automation Parameters and here is where you specify which parameters of the Drum Patch can be controlled in real-time by the Triggers in the Pattern Editor.
For the Tx parameters, unique three-letter codes are used to identify each Drum Patch parameter. In the image above, the codes for T1 is DAV which stands for 'Voice D, Amplitude, Volume'. You can read about all the codes in detail on the Drum Parameters page. A table of all the codes can be found on the Automation page.
There's also a helpful graphical indicator under the Drum Patch parameters themselves.
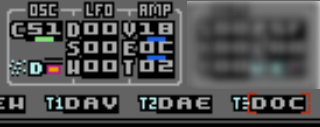
Trigger Parameter Assignment Indicators
The image above shows the parameter sub-group for Voice D and also the Tx parameters. You'll see that under 3 of the parameters is a little coloured marker (like an underline) and that the placement of these markers matches the Tx parameters (DAV = voice D, amplitude, volume: DAE = voice D, Amplitude, Envelope: DOC = voice D, Oscillator, Coarse pitch).
Note: The markers actually flash but this is not shown in the picture.
Also, you can see that one of the three markers is actually coloured green as opposed to the other two which are blue. This is the marker that corresponds to the Trigger Parameter your cursor is currently on (in this case, DOC).
NOTE: I added these little visual reminders because it's important to be aware of which of the Drum Patches parameters are being controlled by the sequencer (Grid). You'll find that when you try editing them in the Drum Patch, your edits will have no effect on the audio (the values in the Drum Editor will change though). This is because the sequencer is writing values to the Tx parameters during playback. This is one of the most important aspects of PR8 to understand.
Multi-Parameter Automation
There are a few special-case Automation Parameters that can send values from the Pattern Triggers to more than one Drum Parameter simultaneously. When you use these Multi-Parameters, as you'd expect, the markers flash underneath each the Drum Parameters that they control.
A list of these Multi-Parameters can be found at the end of the table on the Automation page.