Getting Started With PR8
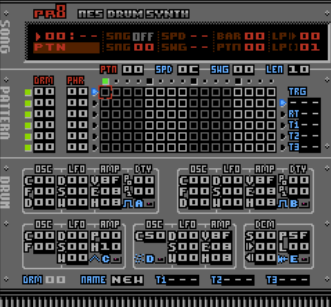
When you load up the ROM for the first time a new .sav file will be 'formatted' for PR8 and it will be empty. This is what you'll be presented with.
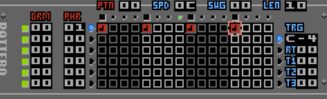
1) Move across to the Track Assignment by holding B and tapping LEFT. Move the cursor into the 'PHR' column and set the Phrase to 01 by holding A and tapping RIGHT:
2) The Drum (DRM:00) that is assigned to the same Track has all Voices turned off by default so we need to enable a Voice in order to hear something. Move down to the Drum Editor by holding B and tapping DOWN. Then with the cursor still in Voice A, tap SELECT to turn Voice A on (you should notice the A switch light up):
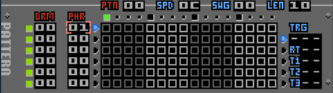
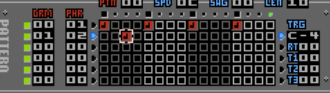
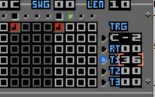
3) In order to make a noise we need to add a Trigger to the Grid. Hold B then tap UP. If the cursor goes to the Track Assignment (which it should because it remembers which of the Pattern 'windows' you were last in when moving to/from the Pattern area), tap RIGHT while still holding B. Put the cursor on the first step of Track 1 (top-left of the Grid) if it's not already there and then TAP A and a Trigger will be created where the cursor is:
4) Tap START and the Pattern should play and you'll hear a very simple note playing on the first step of the Pattern. Congratulations!
A Little Deeper
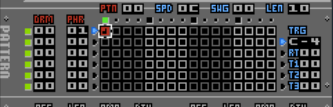
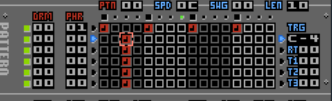
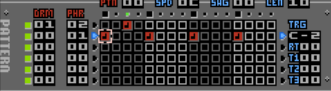
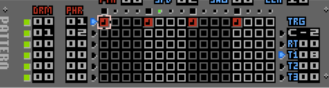
You can continue to tap A in the Grid (stick to the top Track, Track 1 for now). If you want to delete a Trigger, put the cursor on it and tap B. For the sake of the tutorial, add a Trigger to the 5th, 9th and 13th step, like this:
As you move left and right along the Track, you'll see the Trigger Parameter display changing (right-hand side of Pattern Editor). This always displays the parameters for the Trigger under the cursor.
By default, new Triggers are created with pitch C4 - as you can see (and hear), the four Triggers you entered all are the same note. To change the pitch of an existing Trigger, put the cursor on it, hold A and tap UP/DOWN/LEFT/RIGHT. In order to change the Pitch parameter though, the blue indicator arrow in the Trigger Parameters must be pointing at the note (the top parameter). If it is not, move over to the Trigger Parameters by holding B and tapping RIGHT, then without holding B move the cursor to the top. Hold B and tap LEFT to return to the Grid.
Try changing the pitches of the Triggers. PR8 also remembers the last note that was entered (for each track) so that the next time you tap A to enter a new Trigger, the pitch will be set to the remembered value. Try adding a couple of new Triggers after you've modified the pitch of the existing ones.
Phrase Pool
As you are adding Triggers to the Grid, you're adding them to Phrase 01 (assuming you assigned PHR 01 to the Track as I suggested). Phrases are shared by all Patterns/Tracks/Songs (a 'Phrase Pool', if you like) and because of this, if you modify a Phrase by adding/changing/deleting Triggers, those changes will happen wherever you have used that Phrase. As an example do this:
Put the cursor on the 2nd Track (2nd row of the Grid). Tap A to add a Trigger:
What just happened?! Because Phrase 00 is assigned to Tracks 2 to 6, as you change the Phrase on one Track, the changes appear in the others. Try adding Triggers on Tracks 3, 4, 5 or 6 and you'll see.
OK, for now, clean up the mess you've just made by tapping B to remove Triggers from Phrase 00 and get Track 1 back to just 4 notes (make them all C-4 again too):
Tip: if you've deleted a Trigger by tapping B, it's actually lifted from the Phrase and can be pasted back into the Phrase (or any other Phrase) by tapping B on an empty cell in the Grid.
Multi-Voice Sounds
With the Pattern playing (tapping START plays/pauses playback, holding SELECT and tapping START will play the Pattern from the first step), move down to the Drum Editor:
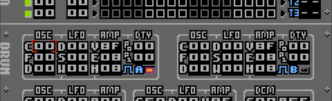
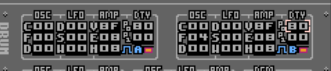
To navigate between the Voices in the Drum, hold B and tap LEFT/RIGHT. Do this to go to Voice B (to the right of Voice A). Now, like before, tap SELECT to turn Voice B on.
You should barely be able to hear both Pulse voices playing simultaneously now. The 'problem' we have is that both voices have exactly the same settings and are playing in unison. To make Voice B obviously more audible, go to the OSC-C parameter and by holding A and tapping UP TWICE you can shift the pitch by two octaves (should read 18 which is hexadecimal for 24). Now you can hear two voices. Experiment with this parameter('Oscillator Coarse Offset') a bit.
When you're done with that, set the OSC-C of Voice B back to 00 for a second. This time (again, with the Pattern playing) go to the OSC-F parameter. This is 'Oscillator Fine Offset' and here you can set a positive or negative detune value - brilliant when you've got two or more Voices playing in unison. Try setting it to 04:
Note: because the NES's pitch is not linear (the higher the pitch, the smaller the numerical gap between semitones), you'll have to tailor the use of the OSC-F parameter in context of the octave of the notes you're using.
Before we go onto another section, lets get this 'Drum' (Instruments/Sounds are always referred to as 'Drums' even though they may not be drum-like) sounding a bit better.
First of all, we'll drop the pitch of the Triggers down by two octaves (this is assuming you've still got all four Triggers playing C-4 and that OSC-C of Voice B is 00).
You can transpose all of the Triggers in a Phrase simultaneously. Go back to the Grid, make sure the Trigger Parameter selector (little blue arrow in the Trigger Parameter area) is pointing at the note and with the cursor either still in the Trigger Parameter area or on a Trigger in the Grid, hold A+B and then tap DOWN twice. You should see that all four Triggers are now set to C-2
Next we'll change the Duty settings for both of the Pulse voices (Voice A and B). Move back to the Drum Editor and to the DTY-P0 parameter of Voice A and and hold A then tap UP to set the value to 80. Then hold B and tap right to move to Voice B and move the cursor to the DTY-P0 parameter of Voice B and this time just tap A - the last value you set is remembered for quicker editing:
Now it's starting to sound more like a bass sound. You could now alter the OSC-F parameter of Voice B to a much higher value before it starts to sound 'out of tune', try 14 to 18.
Virtual Tracks
One of the fundamental features of PR8 is the fact that the Tracks are 'virtual'. What is meant by this is that the Tracks are not explicitly linked to one NES hardware voice. This means you can have a Drum on two or more Tracks that use the same Voice(s). Obviously, there is no 'magic' going on, what happens is that the Tracks 'steal' the use of the Voice when required. The priority for stealing is always this: the lower down the Pattern the Track is, the higher the priority. Let's set something up to illustrate what happens.
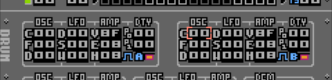
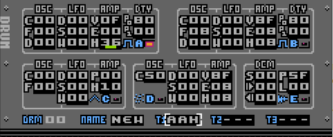
For simplicity, in the Drum we've been making (the bass sound), turn off Voice B. Then on Voice A, set the AMP parameters to 0F, 00, 36 (top-to-bottom). You can read all about the AMP parameters in the manual but what we're doing it essentially turning off the Envelope and extending the length of time that the note is held for so that in the Pattern, one note runs into the next:

Then go to the Track Assignment for Track 2 (the second from the top) and set the Drum (DRM) to 01 and the Phrase (PHR) to 02. Move to the Drum Editor (you should now be editing Drum 01 - the number is shown in the bottom-left of the Drum Editor). Turn on Voice A by tapping SELECT and then set the AMP settings to 0F, 00 and 04 (top-to-bottom). Should look like this now:

What we've got now is a Drum on Track 1 that just uses Voice A and has long held notes (start the Pattern again if it's stopped so you can hear) and then on Track 2 we've got a new Drum that ALSO uses Voice A but it's sound is very short.
Move back to the Grid and on step 3 of Track 2, tap A to place a Trigger. You should now hear that Voice A gets momentarily 'stolen' from Track 1 wherever there is activity in Track 2.
Place a few more Triggers on Track 2 to get a better feel. Even place some on the same step as notes in Track 1 so you can hear how PR8 copes with that too. All the time, Track 2 always takes priority where there's activity - when there's not, Track 1 is allowed to use the Voice.
To further illustrate this we're going to change the vertical order of the Tracks. Put the cursor anywhere on Track 1, then hold A+SELECT and tap DOWN. You should now see this:
and notice that as well as Track 1 and 2 being swapped around (notice the DRM and PHR parameters), you can no longer hear the short notes that you put on Track 2 (which is now Track 1!). This is because the notes on Track 2 are now longer than on Track 1 and because the lower Track (Track 2) has higher priority, Track 1 is never given a chance to 'steal' Voice A. You can flip the two tracks back (and forth) by holding A+SELECT and tapping UP/DOWN, even while PR8 is playing.
When you're done playing, swap the Tracks back to where they were and remove any Triggers from Track 2 leaving the 4 C-4 notes on Track 1.
Automation
OK, last important concept to illustrate: Trigger Automation.
If you've read the manual (you should have!) then you'll know that the T1, T2 and T3 parameters that appear in the Trigger Parameters area and also in the Drum Auxiliary parameters (at the bottom of the Drum Editor) are used to control Trigger Automation.

Drum Aux

Trigger Parameters
In the Drum Aux section, you tell PR8 which 3 of any of the Drum Parameters you'd like to control via Automation.
In the Trigger Parameter (Pattern Editor), you send values to those parameters.
Make sure you're editing Track 1, Drum 00 and hold B and tap DOWN until the cursor is in the bottom-most area, Drum Aux. Move the cursor to the T1 parameter then hold A and tap DOWN until the T1 parameter reads 'AAH' and a little marker should appear under the AMP-H parameter in Voice A.
'AAH' stands for Voice A, AMP, H (Voice A, Amplitude, Hold Time) so what we're going to do is control the Hold parameter using Trigger Automation in the Pattern.
Silence?!
At this point, if the Pattern was playing, it'll now be silent and you're probably wondering why. What has happened is that the T1 values in the Triggers that you placed in the Pattern are overriding the AMP-H parameter on Voice A (because we just told it to) and as we previously had not used the Trigger Parameters, the values that is currently set in T1 is '00' - therefore the T1 parameter is telling PR8 to play the notes for 00 ticks i.e. silent.
(Note: if you add new Triggers using a Drum that already has the T1, T2, or T3 parameters in use, the Tx value will be copied from the Drum parameter that Tx is pointing at.)
To correct this we need to change the values in T1 for the Triggers we've placed. However, there is a 'Remap Trigger' function that comes in handy in these situations.
Either with your cursor on T1 in the Drum Aux section or on T1 in the Trigger Parameters of Track 1, hold SELECT then tap A. You will see a 'wipe' effect go across the track - this is just a visual confirmation of what happened. The T1 values in all the Triggers on Track 1 will now be set to '36'. Why 36? Because this is the value that AMP-H is set to in the Drum.
You should now be hearing sound again.
Now to make it a little more interesting. Move up to Grid and put the cursor on the first note of the Phrase. Then move across (right) to the Trigger Parameters and move the cursor to the T1 parameter which should read '36'. Hold A and tap U/D/L/R to change this to something else, for example 08. You can now hear that the Pattern is controlling the Hold Time for Voice A on Track 1.
Now, because you've moved the Trigger Parameter Selector to T1, when you go back to the Grid and modify one of the Triggers (hold A, tap U/D/L/R), it's not the Note that changes now but the value in T1.
Summary
This inital turorial was just intended to get you familiar with the basic concepts of PR8. Watch out for future tutorials where I'll illustrate how to use the various synthesis methods and advanced Pattern editing and Song Mode and lots of other stuff!